Midi air drums are basically a fun and learning utility for any music enthusiast. As a maker and a drummer I made this as minor project for my degree program. For the past two years, I had wanted to make something like this and have partially reached there.
Midi air drums are air triggered, i.e. unlike the usual drum kits that all musicians play, this one is a unique piece of equipment as it doesn’t need any strike on the pads for a sound to be played.
We just have to move our hands over the sensors which are INFRARED SENSORS and get triggered by our hands and they then send data to the computers built in synthesizer and play the drum notes.
Apart from drums any other wind or percussion instrument can also be played using this project by changing MIDI signals including Channel and instrument bank.
Background
The backbone of this project is MIDI. Midi stands for –MUSICAL INSTRUMENTS DIGITAL INTERFACE.
MIDI (Musical Instrument Digital Interface), pronounced /ˈmidi/, is an industry-standard protocol defined in 1982 that enables electronic musical instruments such as keyboard controllers, computers, and other electronic equipment to communicate, control, and synchronize with each other. MIDI allows computers, synthesizers, MIDI controllers, sound cards, samplers and drum machines to control one another, and to exchange system data. MIDI does not transmit an audio signal or media — it transmits event messages such as the pitch and intensity of musical notes to play, control signals for parameters such as volume, vibrato and panning, cues, and clock signals to set the tempo. As an electronic protocol, it is notable for its widespread adoption throughout the music industry.
All MIDI compatible controllers, musical instruments, and MIDI-compatible software follow the same MIDI 1.0 specification, and thus interpret any given MIDI message the same way, and so can communicate with and understand each other. MIDI composition and arrangement takes advantage of MIDI 1.0 and General MIDI (GM) technology to allow musical data files to be shared among many different files due to some incompatibility with various electronic instruments by using a standard, portable set of commands and parameters. Because the music is simply data rather than recorded audio waveforms, the data size of the files is quite small by comparison.
The MIDI system is based on the concept of the user being a keyboard player, rather than say a wind instrument or guitar payer. In its simplest form MIDI is the means by which note information is sent, e.g. when a ‘key’ on the keyboard is pressed. The type of information that is sent is event information and not audio. That is to say MIDI is used to describe when a note is pressed, which note it is, how hard and for how long, but not the sound that is created by this action. MIDI is also used for a whole host of other events, but the action of pressing a note is the simplest to describe and emphasize the point at hand. The other thing to note is that MIDI is a serial data stream and runs at 31250 baud.
MIDI SPECIFICATIONS
A ‘standard’ MIDI word consists of three bytes, though depending on use it may have more or less, generally though. the first is a Status byte, the second and third are data bytes.
So, with a stream of data coming in, how do you know which byte is which? And which byte is for you? lets take the action of pressing a NOTE on the keyboard, this is called a Note Event. Three bytes are sent; NOTE_ON , NOTE, VELOCITY
if we assume we’re working on Midi Channel one the data would look something like this
0x90, 0x3C, 0x7F
lets go through the bytes one at a time.. first the status byte, 0x90 if we translate this into binary we get ;- 10010000 The upper nibble (1001) shows we have a NOTE_ON event, the lower nibble (0000) is the MIDI channel, MIDI device can have a channel number between 1 and 16, because People work better with numbers starting at 1 rather than 0, so simply subtract one from the channel number to get the expected value here, e.g. if we wanted MIDI channel 8 we Would expect to see 0111 (7). The next byte is the NOTE value, in this case 0x3C which is note 60, which is in fact middle C. The final byte is 0x7F, which is the velocity i.e how hard the key was pressed, in this case maximum.
Now, many of you will have noticed that I said the maximum velocity was 0x7F, which in binary is 01111111. But surely, you ask, isn’t the maximum 0xFF i.e. 11111111? The answer is not for MIDI, a Status byte is defined by the fact that it has the MSB set, all other bytes that are data must NOT have the MSB set, so the
valid range is 0-127for any data. This may seem very limiting at first but given that this gives nearly 12 octaves of note data and also given that very few people can press a note with an accuracy approaching seven bits, its not as bad as it may seem. Remember we’re just sending note information, not audio, so resolution isn’t so much of an issue. This gives us the added advantage that status byte are easily separated from data bytes, how? Easy all status bytes have the MSBsetto1, all data bytes have it set to 0.

Two types of note off!
Two types? you ask, surely you only let go of a note once? Yes, But one of the things that is done by various manufacturers is to use one of two types of note off. Remember the velocity byte of the NOTE_ON command? If it was set 0 you would not expect the note not to sound, wouldn’t you? I mean try pressing a note without any velocity, it can’t be done.. So, using our middle C note a stream could look like this 😉
0x90 0x3C 0x7F
NOTE_ON C Velo
0x80 0x3C 0x7F
NOTE_OFF C Velo
Velocity? on a note off? Yes, it’s the release velocity, how quickly you let go of the key.
However some manufacturers send this ;-
0x90 0x3C 0x7F
NOTE_ON C Velo
0x90 0x3C 0x00
NOTE_ON C Velo
This last event with a note on and a velocity of ‘0’ would mean ‘turn off the note please’ So your software needs to be able to recognise both types of note off command.
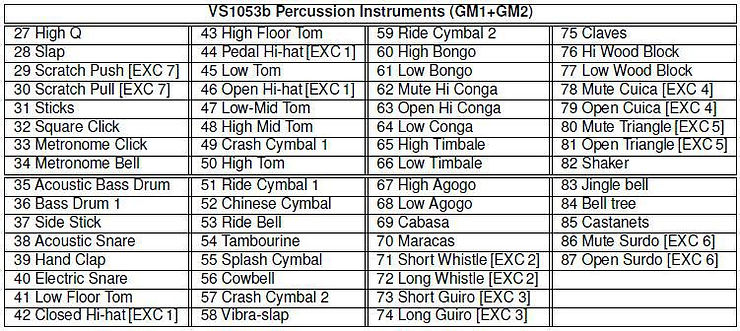
As we have to have to make midi air drums. Therefore in the general midi specifications {GM} the midi channel that controls drums is the channel number 10.
And the various percussive sounds of the drum notes are defined below.
On MIDI Channel 10, each MIDI Note number (“Key#”) corresponds to a different drum sound, as shown below. GM-compatible instruments must have the sounds on the keys shown here. While many current instruments also have additional sounds above or below the range show here, and may even have additional “kits” with variations of these sounds, only these sounds are supported by General MIDI Level 1 devices.
PROJECT DESIGN
As the midi signals are sent to the midi devices at a baud rate of 31250 bps, we have to select a microprocessor or microcontroller to make our midi device.
The drum kit is a midi device that send MIDI to another MIDI device that is the computer in our case.
So we chose a microcontroller that should be capable of sending data to the pc at a baud rate of 31250 bauds per second.
The best choice would be an ATMEGA SERIES MICROCONTROLLER.
So we chose ATMEGA8 from AVR microcontrollers running at 8 mhz.
HARDWARE:
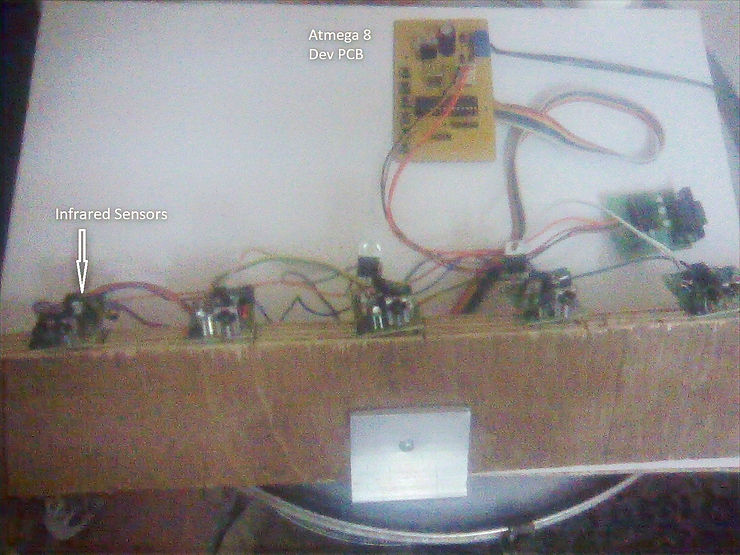
MICROCONTROLLER BOARD
The development board was to hold a rectifier to convert incoming ac power to proper dc and then convert it into 5 volts for microcontroller to work in TTL logic. For rectification we used 4 diodes 1n4007 and one capacitor.After that the microcontroller was to placed so we placed a atmega8 and supplied it with the regulated 5 volt supply.
Port b of the microcontroller were used as inputs, tactile micro switches were connected for the same. And for serially programming the microcontroller a six pin male header was attached .
The UART of the microcontroller has to send the data to the pc via the comport so a 4 pin male header is attached for the pins, Rx,Tx, Vcc and ground.
The PCB for the microcontroller development board was designed using the FREEWARE DIPTRACE SOFTWARE.


IR Sensors
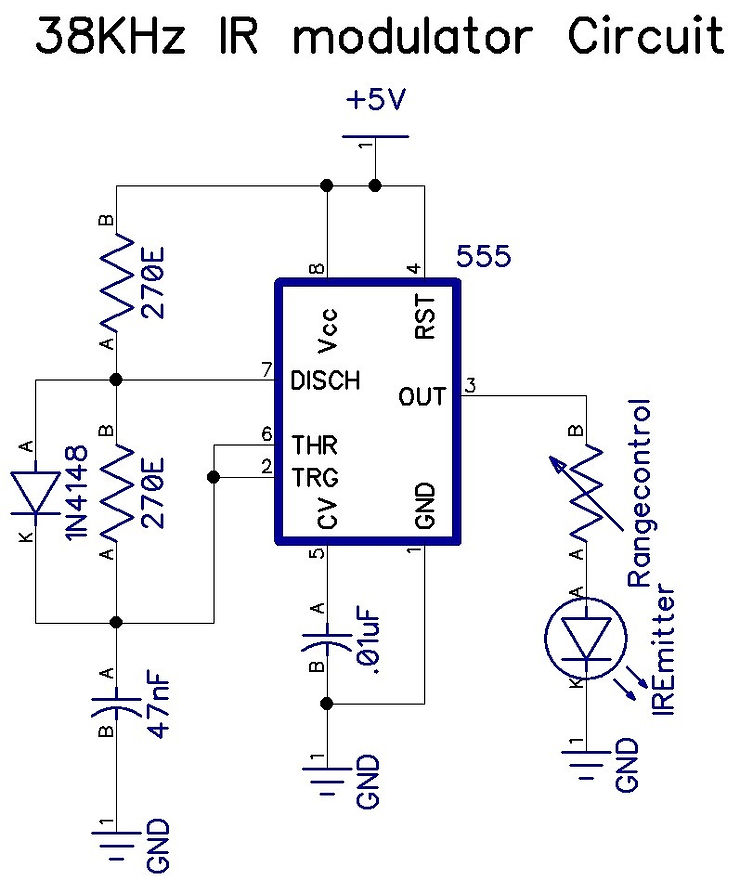
The method of triggering our midi air drums are the infrared sensors.
The infrared sensors are made using a 555 timer in astable mode to generate 38 kilohertz frequency and the infrared led is modulated at 38 kilohertz.
The TSOP 1738 SENSORS are used to detect this modulated infrared signals.
The TSOP sensors are made of three pins 1 Vcc 3 output 2 Gnd
If the TSOP is receiving the IR signals then its output pin goes low otherwise its output pin remains high.
So, the microcontroller scans for the 5 sensors and as soon as the sensors output pin goes low, the midi signal is send to the computer.
SOFTWARE:
WinAVR is a suite of executable, open source software development tools for the Atmel AVR series of RISC microprocessors hosted on the Windows platform. It includes the GNU GCC compiler for C and C++.
WinAVR contains all the tools for developing on the AVR. This includes avr-gcc (compiler), avrdude (programmer), avr-gdb (debugger), and more! WinAVR is used all over the world from hobbyists sitting in their damp basements, to schools, to commercial projects.
Source Code
#include<avr/io.h> //HEADER FILE FOR INPUT OUTPUT
#include <compat/deprecated.h> // HEADER FILE FOR SBI , CBI COMMANDS
#include<util/delay.h> // HEADER FILE FOR DELAY
#include "uart.h" //HEADER FILE FOR UART


void midi(uint8_t cmd, uint8_t data1, uint8_t data2) //MIDI FUNCTION TO SEND
DATA OVER UART
{ uart_tx_char(cmd);
uart_tx_char(data1);
uart_tx_char(data2);
}


int main(void) // MAIN FUNCTION
{PORTD=0XFF; //INITIAL PULLUP
PORTB=0XFF; // INITIAL; PULL UP OF ALL PORT PINS
uart_init(38400); // SET DATA TRANSFER RATE
while(1)
{
if (bit_is_clear(PINB,0)) //IF SENSOR 1 IS ENCOUNTERED
{midi(0x9A,0x23,0x7f);
//midi(0xAA,0x23,0x7f);
_delay_ms(200);
midi(0xAA,0x23,0x70);
}


else if(bit_is_clear(PINB,1)) //IF SENSOR 2 IS ENCOUNTERED
{midi(0x9A,0x7C,0x7f);
_delay_ms(200);
midi(0x8A,0x7C,0x70);
}
else if(bit_is_clear(PINB,2)) // IF SENSOR 3IS ENCOUNTERED {midi(0x9A,0x25,0x7f);
_delay_ms(200);
midi(0x8A,0x25,0x70);
}
} else if(bit_is_clear(PINB,3)) // IF SENSOR4 IS ENCOUNTERED {midi(0x9A,0x25,0x7f);
_delay_ms(200);
midi(0x8A,0x25,0x70);
}
else if(bit_is_clear(PINB,4)) // IF SENSOR5 IS ENCOUNTERED {midi(0x9A,0x25,0x7f);
_delay_ms(200);
midi(0x8A,0x25,0x70);
} return(0);}
This program runs in the microcontroller and sends data [midi data ] over the uart to the comport of the computer. The computer is running a software edrummonitor that converts the incoming data from 38400 baud rate to 31250 baud rate .
The midi signals are then routed to the Microsoft built in synthesizer on our pc sound card.
MIDI PROTOCOL
For our purpose, only a few MIDI messages are of interest. Each message begins with a status byte, which has its first bit set, followed by some number of data bytes, which have their first bit cleared. The first nibble of each status byte is a command code and the second nibble is the channel, allowing for 16 channels.
NOTE ON
This message tells the synthesizer to begin playing a key (KK) with a velocity (VV), where each key corresponds to a note and velocity is equivalent to how quickly a note was hit. KK is the first data byte, VV is the second data byte.
NOTE OFF
This message tells the synthesizer to stop playing a key (KK) with a velocity (VV), where each key corresponds to a note and velocity is equivalent to how quickly a note was released. KK is the first data byte, VV is the second data byte.
This sets the current output volume, on a scale from 0 to 127. First data byte is 7, second is the desired volume.
The speed and accuracy of the midi air drums is excellent considering the speed of the microcontroller and the limited sampling rate. There is some noticeable latency; however, after two days of using the midi air drums, it became practically unnoticeable.
FUTURE SCOPE
This device holds a very bright future as far as live performance are considered. As this is made using minimum components , this can further be expanded to great horizons and can create a revolution in music instruments industry.
Laser can also be utilized in place of IR SENSORS.
Another very thoughtful idea of improving the same can be using an accelerometer to trigger midi and send data which will eliminate the use of sensors and just like motion gaming can be used to create music .
It can also be used in interactive toys for kids for easy and early learning of any music instruments.
As we have named this project MIDI AIR DRUMS , any musical instrument can be played with the same device.
Presently the data is sent to the computer or the drum module via wires, furthermore can be eliminated and wireless modules such as CC 2500 2.5 GHz wireless transceivers can be used to send data wirelessly and increase the portability of the project .