
TRIGGER TO MIDI ——–> MIDI TO GARAGE BAND
Have you ever desired to create your own music instrument, I always wanted one.
I wanted to play drums, and to be able to do that, you need to train on it. Since high school, I never got a drum kit handy at school, so I decided to buy one and manage to buy one by end of high school. Thanks to extra tuitions I offered to some high school kids.
After I purchased an acoustic drum kit, the neighbours were behind me to stop playing it.
Then I decided to go for AN ELECTRONIC DRUMKIt, where I can forever practice with my earphones on. This was one go to idea to fuel my DiY fever and I homed on to the edrum .
Learnt about MIDI (Musical instruments digital interface) and focused my third term project on the same concept. First tried Airdrums with Infrared sensors and sending MIDI signals to a desktop PC running edrum monitor/tractor or an ableton live to trigger midi outputs.
Due to Latency issues, decided to go for the analog comparators that triggered piezo sensors on impact by a stick or hand.
This was one of my dream projects which came to fruition recently
This is a complete drum kit or beginners, where you can learn, play , coach and even play live. The kit is divided into 4 parts:
- Drum Rack.
- Drum pads.
- Trigger to Midi Converter.
- Midi to Sound Conversion.
Part 1 : Drum Rack
The drum rack is made by using GI pipes and Aluminium Pipes.

The complete list of materials used is as under
- Elbow – 6
- T Joint – 7
- 1′ Pipes – 5
- 2′ Pipes – 1
- 2.5′ Pipes- 1
- Misc Nuts, Bolts and welded angles.
The final structure can be refered to For design changes and modifications.
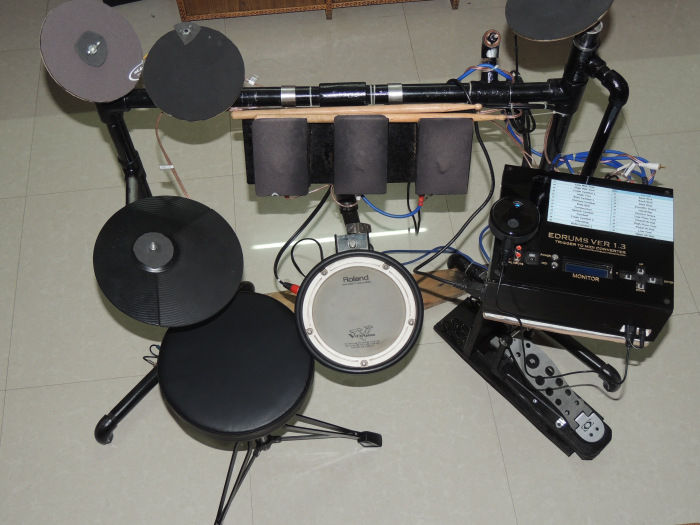
Part 2 : Drum Pads
The Drum Pads are made by using these basic materials
- Piezo Electric Sensor
- Sponge
- 6mm MDF
- Wires
- Female RCA sockets
The picture depicts three toms , splash, ride and crash cymbals, made by sandwiching one piezoelectric sensor between sponge and a 6mm MDF.

For the snare, I used a Roland PDX-6 and a CY-5 for HiHat.
BaSS Drum Trigger
The Bass Drum Trigger is made by using a Pluto Acoustic Drum Pedal with a Hammer.The only modification done to convert this into trigger is by adding a Piezo Electric Sensor, by employing a Plywood L shape platform and adding sponge to it.It can be very easily made with two 5″ * 12* plywood at 90 degree angle with Bass Pedal attached to it.This can be easily seen from the picture below.


Hi-Hat Pedal
The HiHat Pedal is a basic Potentiometer Pedal available in local market used for synthesizers or Octopads. It is a Volume pedal , with no modifications. The drum trigger is capable of operating a HI HAT in two modes, switch and pedal. Thus, for ease of implementation and readily available and time tested LDR Led pedal, the same is running successfully in controlling Open and Closed Hi Hat positions.

Part 3 Trigger to Midi Converter
Thanks to Admir Salahovic who has made the complete project of Drum Trigger Converters open source on his website http://www.edrum.info
The trigger has been made by refering all the resources from Admirs website , so for trigger conversion there can be no other better source than http://www.edrum.info. I request any enthusiast to go through the complete website, however in India in case of any doubt or any design issues, please feel free to contact me.
I am posting some of my Design of Trigger to Midi Converter.


Part 4 Midi to Sound Conversion
For this part you have three options.
Option 1 : Running Midi Signals to your PC running any famous Drum/ synth software such as Propellerhead Reason/Ableton Live/ Sonar LE/ Garageband, etc.
for this you need to have a Midi to Usb converter cable and proessional sound card as the inbuilt sound card of PC/ Laptop will cause Latency and Lag, resulting in delayed playing of sounds.
Option 2 : Using a sound module with a Midi Input or a Drum Machine with a Midi Input. The cheapest and best options available are
1. Making own Drum Sampler by refering SamplerBox, a Diy synth made by an open source community using a Raspberry Pi.
2. Again making own drum machine/synth by using Zynthian Design again an open source community with free Software and Hardware.
3. Buying an Alesis SR16/ SR 18 Drum machine with Midi Input.
Option 3 : Using your iPhone/iPad running Garageband with the help of a Midi to
USB converter. I tried the same with a Roland UM one MK2.
The best and the working solution to this I found was a recently introduced feature by ios i.e. BLE MIDI(Bluetooth Low Energy Midi ).
This tech uses Bluetooth ver 4.0 to recieve MIDI messages from Midi to Bluetooth converter.
Again thanks to Zivix for making such an elegant and beautiful product by the name of PUC+.


This completes my Diy Electronics Drum Kit.
I am posting completed images of my drum kit here for your reference.


Thanks for the read. Stay Tuned.